Create Your Own Polymer Clay Figurines
2 min read

Gather Your Materials
Before you dive into the world of polymer clay, it's essential to gather all the materials you need. Here’s a quick list:
Polymer clay, I use Sculpey doll clay, the above photo is AI generated as I don't
Clay tools (sharp craft blade, sculpting tools ie: nail kits are handy, clean round pens for rolling out the clay
A clean work surface
Baking sheet and aluminum foil
Toaster Oven (for hardening your figurines)
Optional: Paint and sealants for finishing touches
Shape Your Figurine
Once you have everything ready, it’s time to start shaping your polymer clay figurine. Here are some simple steps to guide you:
Condition the Clay: Begin by kneading the polymer clay until it’s soft and pliable. This step is crucial as it prevents cracks and ensures an even texture.
Plan Your Design: Think about what figurine you want to create. Whether it’s a cute animal, a character from your favorite movie, or a whimsical creature, having a plan will help you stay focused. I look at photographs
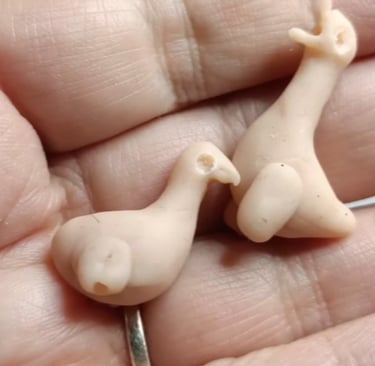
Create Basic Shapes: Form the basic shapes for your character using balls and sausages of clay. Don’t worry too much about the details yet!
Assemble the Parts: Combine different shapes together, smoothing the seams with your fingers or a sculpting tool. Make sure to pay attention to proportion and balance.
Add Facial Features: Add tiny glass eyes, use a craft knife or similar to add tiny lines for the beaks, nostrils, around the eyes. This is where your figurine starts to come to life, the more details the better!
Bake and Finish Your Figurine
After you’ve sculpted your figurine perfectly, it’s time to bake it to set the clay. Follow these instructions:
Preheat Your Oven: Set your oven to the temperature specified by the clay manufacturer, usually around 275°F (130°C).
Prepare for Baking: Place your figurine on a baking sheet lined with aluminum foil to prevent sticking.
Bake: Pop your creation in the oven for about 15-30 minutes, depending on its size. Keep an eye on it to avoid over-baking!
Cool Down: After baking, let your polymer clay figurine cool completely before handling it.
Now, you can add any finishing touches, paint the clay and use finely cut wool for flocking material, cut feathers into tiny feathers and apply them to the wings and the tail. This will make your figurine realistic. Creating with polymer clay is not just about making art; it’s about enjoying the process and letting your creativity flow.
So, grab some clay and start sculpting today!